Examining the captivate workflow
Wherein failure to follow this document will most likely fuck you over. And wouldn't it be refreshing to read a manual that was that explicitly honest.
Captivate is Adobe software used to create to create tutorials and demonstrations. It's fairly simple to use, and I'm generally not doing anything that stresses the software, yet it has one major shortcoming that the documentation does not adequately warn about. That being, this is a very unforgiving application. Even though Captivate allows a number of customizations, many actions do not have an undo. Some, such as resizing, will completely destroy the project if done improperly, or in the wrong order, and force you to start over. For that reason, I've created a workflow that saves and creates multiple copies of the work at different stages.
This may look a bit convoluted and repetitive, but don't come crying to me if you ignore this advice.
I work each individual tutorial through the following stages:
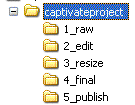
Each stage has its own folder:

Saving raw files
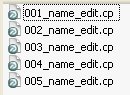
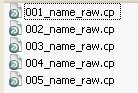
The raw file is the captured movie. This includes all mouse actions and menu navigations; basically anything that happens during the recording. This file will probably contain many screens you’ll end up deleting. Don’t worry about it, save everything. Here’s an example of a raw folder for a project with five tutorials:

I add the stage name to the file name to help avoid confusing it with other files. The numbering makes it easier to remember the files you’ve worked on. Remember, no work is done on the files in this folder. This is your backup if something goes wrong. The raw file will be edited into the final editorial, so save a copy of the file into the Edit folder.
Working edit files
Rename the raw to the edit files:
The edit file is your working file. If you screw it up, you still have the original raw movie. As you edit, Label the frames you are keeping. If you create links between slides, the link will be maintained if a slide is moved. If you do not label the slide, you will lose the link. Trust me, I learned this the hard way.
You’ll most likely have a number of extra slides that you’ll want to delete. A good tip if you’re not sure if you should delete a frame is to select Hide Slide. This keeps it in the edit project if you do need it, but it won’t appear in the final movie while hidden. And if you find you deleted a slide you now need, well, that's what the raw file is for.
Sometimes it’s helpful to copy a background and paste that background on another slide. Warning: pasting a background cannot be undone, so be careful. Maybe create a copy of the slide in question and paste into it. This is why we keep the raw file, because you can then just import a single slide. Or you could create a blank slide to paste the background on.
When editing is complete, save a copy to the resize folder.
Resizing a tutorial
Resizing the tutorial adds white space to the bottom of the tutorial so the playback control does not interfere with the project.
An example of the Resize folder:
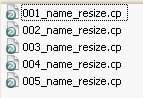
Warning: If you do nothing else, you should create this folder. If you don’t and you screw up the resizing on the primary edit file, there is no undo -- you will have to start all over from the raw file; and if you didn't save a raw file, you'll have to reshoot.
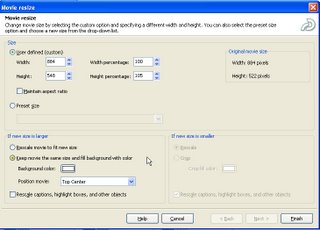
The following steps add white space to the bottom of the tutorial while keeping the tutorial the same size. These steps must be completed in order or bad stuff happens.
Here's the window before clicking Finish:
Now you can add the playback controls. The position should be Bottom Center.
Save a copy of this file into the Final folder.
The Final folder
The final folder contains the completed tutorials.

These are the files you will use to create the Flash files (save to the Publish folder) or Word handouts (create a Word folder).
The Publish Folder
The Publish folder holds the Flash files created from the finished tutorials in the Final folder. Take copies of these files and insert them in an online help project or create a CD. If you're using the Captivate MenuBuilder, these are the Flash files you'll reference.
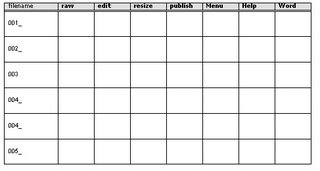
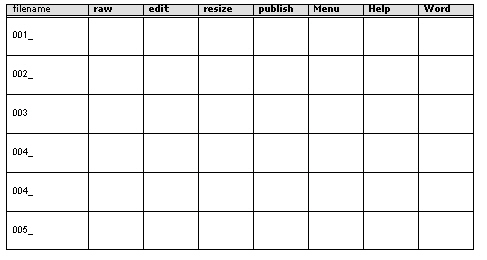
Worksheet
I like to use a worksheet to keep track of my progress. If I’m creating a project with multiple tutorials I like to work in assembly line style: shoot all the movies, then do all the editing, resizing, etc.
There you go. If I have to make edits after a review, I work off the Edit file and repeat steps 2-5. Depending on the project I have "archived" the first edit file and work off an Edit2 file. As always, whatever works.
Captivate is Adobe software used to create to create tutorials and demonstrations. It's fairly simple to use, and I'm generally not doing anything that stresses the software, yet it has one major shortcoming that the documentation does not adequately warn about. That being, this is a very unforgiving application. Even though Captivate allows a number of customizations, many actions do not have an undo. Some, such as resizing, will completely destroy the project if done improperly, or in the wrong order, and force you to start over. For that reason, I've created a workflow that saves and creates multiple copies of the work at different stages.
This may look a bit convoluted and repetitive, but don't come crying to me if you ignore this advice.
I work each individual tutorial through the following stages:
- Raw. The initial movie creation.
- Edit. Working the raw frames into the final form. Depending on your project, you may have more than one Edit stage.
- Resize. Creates white space around the movie to keep the playback controls from overlapping the frame.
- Final. Completed tutorials.
- Publish. The final Flash files.
Each stage has its own folder:
Saving raw files
The raw file is the captured movie. This includes all mouse actions and menu navigations; basically anything that happens during the recording. This file will probably contain many screens you’ll end up deleting. Don’t worry about it, save everything. Here’s an example of a raw folder for a project with five tutorials:
I add the stage name to the file name to help avoid confusing it with other files. The numbering makes it easier to remember the files you’ve worked on. Remember, no work is done on the files in this folder. This is your backup if something goes wrong. The raw file will be edited into the final editorial, so save a copy of the file into the Edit folder.
Working edit files
Rename the raw to the edit files:

The edit file is your working file. If you screw it up, you still have the original raw movie. As you edit, Label the frames you are keeping. If you create links between slides, the link will be maintained if a slide is moved. If you do not label the slide, you will lose the link. Trust me, I learned this the hard way.
You’ll most likely have a number of extra slides that you’ll want to delete. A good tip if you’re not sure if you should delete a frame is to select Hide Slide. This keeps it in the edit project if you do need it, but it won’t appear in the final movie while hidden. And if you find you deleted a slide you now need, well, that's what the raw file is for.
Sometimes it’s helpful to copy a background and paste that background on another slide. Warning: pasting a background cannot be undone, so be careful. Maybe create a copy of the slide in question and paste into it. This is why we keep the raw file, because you can then just import a single slide. Or you could create a blank slide to paste the background on.
When editing is complete, save a copy to the resize folder.
Resizing a tutorial
Resizing the tutorial adds white space to the bottom of the tutorial so the playback control does not interfere with the project.
An example of the Resize folder:

Warning: If you do nothing else, you should create this folder. If you don’t and you screw up the resizing on the primary edit file, there is no undo -- you will have to start all over from the raw file; and if you didn't save a raw file, you'll have to reshoot.
The following steps add white space to the bottom of the tutorial while keeping the tutorial the same size. These steps must be completed in order or bad stuff happens.
- From the Movie menu, select Resize Movie.
- Deselect Maintain aspect ratio. You must do this step before step 3. If you do not, then the resize is distorted, there’s no undo, and you’ll have to trash this file and make another copy of the edit file.
- Increase the height by 5% by typing 105 in the Height percentage field. You may have to test this. Five percent seems to work, but depending on your original slide size this may be off. If you have a batch of tutorials, get the ratio correct with one before doing the others.
- Select Keep movie the same size and fill background with color.
- Color is White.
- Position of movie is Top Center.
- Deselect Rescale captions, highlight boxes, and other objects. If you want to see something funny, don’t do this step.
- Click Finish.
Here's the window before clicking Finish:

Now you can add the playback controls. The position should be Bottom Center.
Save a copy of this file into the Final folder.
The Final folder
The final folder contains the completed tutorials.

These are the files you will use to create the Flash files (save to the Publish folder) or Word handouts (create a Word folder).
The Publish Folder
The Publish folder holds the Flash files created from the finished tutorials in the Final folder. Take copies of these files and insert them in an online help project or create a CD. If you're using the Captivate MenuBuilder, these are the Flash files you'll reference.
Worksheet
I like to use a worksheet to keep track of my progress. If I’m creating a project with multiple tutorials I like to work in assembly line style: shoot all the movies, then do all the editing, resizing, etc.
There you go. If I have to make edits after a review, I work off the Edit file and repeat steps 2-5. Depending on the project I have "archived" the first edit file and work off an Edit2 file. As always, whatever works.
posted by bill at 10:46 PM
![]()
![]()

1 Comments:
Thanks for sharing your workflow. I am just beginning a project that has 33 Captivate movies and had no idea how I was going to keep everything organized. Your system is going to help me a lot!
Ryan
Post a Comment
<< Home